

Butterfly wings look smooth and colorful from a distance, but under a microscope they become a landscape of tiny scales, veins, edges, and patterns. What looks like powder on the surface is actually made of small overlapping scales. These scales help create the colors and textures that make butterfly wings so striking.
For beginners, a butterfly wing is a strong microscope subject because it does not require cutting, staining, or complex slide preparation. A prepared specimen, a naturally found wing, or an educational sample can show clear details with simple top lighting. The goal is not to identify a butterfly species from one close-up image, but to observe scales, color zones, wing veins, and surface texture.
What Can You See on a Butterfly Wing Under a Digital Microscope?
Tiny Scales Covering the Wing Surface
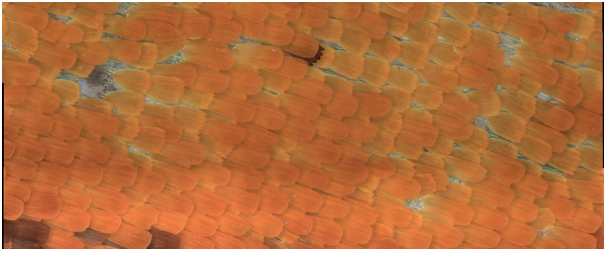
The most obvious feature is the layer of tiny scales covering the wing. Under magnification, they may look like shingles, small plates, or overlapping leaves. Some appear long and narrow, while others look shorter or more rounded.
These scales are not randomly placed. They form rows and patterns across the wing surface, which helps explain why butterfly wings look so detailed up close.
Color Patterns Across Different Wing Areas
A butterfly wing is not one flat color. Bright, dark, pale, and patterned areas can look very different under magnification. Moving across the wing may reveal changes in scale density, shape, and reflectiveness.
This makes the sample useful for beginners because you can compare several areas from the same wing instead of relying on one view.
Wing Veins, Edges, and Fine Textures
You may also see wing veins, outer edges, missing scales, or tiny damaged areas. Veins often look like raised lines that divide the wing into sections.
The edge of the wing can be especially interesting. It may show fraying, overlapping scales, or places where the surface has worn away.
Why Do Butterfly Wings Look Powdery?
The Powder Is Made of Tiny Scales
The powdery material on butterfly wings is made of tiny scales. When scales rub off, they may leave a dusty mark on your fingers or on a surface.
Under a microscope, loose scales can look like tiny flakes. This is why the wing surface should not be rubbed or pressed during observation.
Scales Help Create Color and Pattern
Butterfly colors are closely connected to their scales. Some color comes from pigment, while some visual effects can come from how the wing surface reflects light.
For a beginner observation, the key point is simple: the color is not painted onto a flat surface. It is built from many small scale-covered areas.
Touching Wings Can Remove Scales
Touching a butterfly wing can remove scales, especially if the contact is rough. Under magnification, those areas may look faded, patchy, or bare.
For microscope work, handle only the edge if necessary. Better yet, use tweezers and avoid touching the colored surface at all.
What Kind of Sample Should You Use?
Use a Prepared or Naturally Found Specimen
The best choice is a prepared educational specimen, a naturally found wing, or a sample from an already dead insect. This avoids harming live butterflies and gives you a flatter subject to observe.
A damaged wing can still be useful. Missing scales, torn edges, and exposed areas may actually make the structure easier to understand.
Avoid Handling Live Butterflies
Do not catch a live butterfly just to view its wing. Handling can damage the scales and may harm the insect.
For this project, use a safe sample that does not require disturbing wildlife. Prepared specimens are usually easier for beginners because they are flatter and simpler to position.
Choose a Flat Wing Area First
Start with a flat section rather than a folded, curled, or torn part. A flat area is easier to focus on and photograph.
Once you understand the basic scale pattern, you can move toward the edge, vein areas, or damaged spots for a closer look.
What Do You Need to View a Butterfly Wing?
A Digital Microscope With Adjustable Lighting
Butterfly wings are dry surface samples, so top lighting is usually enough. Adjustable lighting matters because bright areas can reflect glare, while darker areas may need more light.
For beginners, a digital microscope for specimen observation can make it easier to view wing scales on a screen, fine-tune LED brightness, and save close-up images for comparing different color areas.
A Clean Surface or Slide for Support
You can place the wing on a clean slide, white paper, dark paper, or another flat support. A slide helps keep the sample stable, but it is not always required.
Choose a background that gives contrast. Dark wings may show better on a light surface, while pale sections may stand out better on a darker one.
Tweezers, Paper, and Small Storage Tools
Use tweezers to move the sample by the edge. A small piece of paper can support fragile parts, and a small envelope or container can protect the sample after viewing.
Keep the setup simple. The main goal is to keep the wing dry, flat, steady, and easy to reposition.

How Should You Prepare the Wing for Observation?
Keep the Wing Dry and Flat
A dry wing is easier to inspect than a damp or curled one. Moisture can make the surface stick to tools and change how light reflects from the scales.
Place the wing gently on a flat surface. Do not press hard. If it curls slightly, support the edge with small pieces of paper.
Handle the Edges Gently
Always handle the wing by the edge or a less important area. Avoid touching the main color pattern.
If using tweezers, hold lightly. Too much pressure can tear the wing or scrape away the scales you want to observe.
Avoid Rubbing the Wing Surface
Rubbing can remove scales, blur the natural pattern, and create artificial bare patches. If dust or loose particles are present, do not wipe the wing.
Instead, observe another area or use a different sample. A slightly imperfect specimen is better than one damaged during preparation.
How Do You View Butterfly Wing Scales Clearly?
Start With Low Magnification
Start at low magnification so you can see the overall color zone, wing vein, or edge area. This helps you understand where you are on the wing before zooming in.
After finding an interesting area, increase magnification gradually and refocus each time.
Adjust Top Lighting to Reduce Glare
Strong top light can make bright scales look washed out. If the image is too shiny, reduce the brightness or shift the light angle.
Dark areas may need more light, but too much brightness can flatten the texture. Good lighting should reveal scale edges without turning the image white.
Move Across Color Areas Slowly
Move across the wing slowly. Compare bright zones, dark zones, veins, edges, and damaged areas.
This method helps you see how scale shape and arrangement change across the wing. It also makes it easier to choose useful areas for photos.
What Details Should Beginners Look For?
Scale Shape and Arrangement
Look at how the scales overlap and align. Some areas may show neat rows, while damaged areas may look uneven or patchy.
Use simple descriptions: overlapping, narrow, flat, missing, torn, clustered, or scattered. You do not need to identify every structure.
Differences Between Bright and Dark Areas
Bright and dark areas may show different textures under magnification. One area may look dense and smooth, while another may look more open or reflective.
Try comparing nearby areas at the same magnification and lighting. This makes the differences easier to notice.
Damaged, Missing, or Overlapping Scales
Damaged areas can be useful for learning. Missing scales may reveal the surface beneath, while overlapping scales show how the wing pattern is built.
Do not assume damage makes the sample useless. For beginners, imperfect sections often make the structure easier to see.
How Can You Capture Clear Butterfly Wing Images?
Keep the Wing Still Before Capturing
Before taking a photo, make sure the wing is not moving. Even a small shift can blur scale edges.
Place the sample flat, adjust focus, and avoid touching the table while capturing. A clear low-magnification image is often better than a blurry close-up.
Save Photos From Different Wing Areas
Take photos from several areas: a bright color zone, a dark zone, a vein, an edge, and a damaged section. This gives you a more complete record of the wing.
For beginners who want to document small details, a TOMLOV DM301 Pro digital microscope can help capture close-up photos or videos of wing scales, edges, and color patterns for later comparison. Its product page lists a 7-inch IPS screen, media capture through app support, 8MP photos, 1080P video, and adjustable top and bottom LED lighting.
Label Images by Color, Location, and Magnification
Label each image with simple notes such as “bright area,” “dark edge,” “near vein,” or “damaged patch.” Add magnification if you know it.
These notes make your photos more useful later, especially if you compare different areas or different samples.
Conclusion
Butterfly wings reveal tiny scales, color zones, veins, edges, and hidden textures under a microscope. The powdery surface is not dust; it is made of delicate scales that should be handled carefully.
For the clearest view, use a dry and flat sample, avoid touching the colored surface, start with low magnification, adjust top lighting, and save photos from different wing areas. The goal is careful visual observation, not species identification.
FAQs
Do Butterflies Have 2 or 4 Wings?
Butterflies have four wings: two forewings and two hindwings. When resting, the wings may overlap or fold together, making them look like two large wings. Under close observation, you can usually see the separation between the front and rear wing sections.
Is It Okay to Touch a Butterfly’s Wings?
It is better not to touch a butterfly’s wings. The powdery surface is made of tiny scales, and touching or rubbing can remove them. For microscope observation, use a prepared specimen, a naturally found wing, or an already dead sample instead of handling a live butterfly.
Can Butterflies Have 8 Wings?
No. Butterflies normally have four wings, not eight. They have one pair of forewings and one pair of hindwings. If they appear to have more, it is usually because of overlapping wing sections, shadows, motion, or confusion with body parts.
What Is a Butterfly’s Enemy?
Butterflies have many natural enemies, including birds, spiders, wasps, ants, lizards, frogs, and some small mammals. Caterpillars also face predators and parasites. These enemies are part of the natural food web, and wing patterns may help butterflies with camouflage, warning signals, or distraction.